
Portainer - The Complete Guide
Portainer is a a docker controller in simplest terms. It is a great way to see what containers are running and allow you to see the resources that the containers are using. Also the dashboard allows for you quickly see what is going on and what container is running on what ports.
Background
Portainer is a a docker controller in simplest terms. It is on the level of Rancher is for Kubernetes resources. With docker swarm you can do the same thing as Kubernetes, but for most homelabs, this is probably overkill.
Well that is where Portainer comes into play. It is a great way to see what containers are running and allow you to see the resources that the containers are using. Also the dashboard allows for you quickly see what is going on and what container is running on what ports.
For this installation and usage, I am running a Ubuntu Server 18.04 as a VM via my [[Proxmox]] server. If you are here, I would assume that you either understand the translation for running the below commands in windows/apple/your favorite flavor of Linux or you have Ubuntu installed (See this post for installing Ubuntu in Proxmox).
Installation Setup
Step 1 - OS Preparation OS
Of course the first thing you need to do is update/upgrade your OS
Super easy. Say yes and let it run.
The next things to do is you are going to want to either give this host a DHCP reservation or a static IP. To give it a DHCP will be based on your router/DHCP server and if you want to give it a static IP, here is a link to how to make a static IP in Ubuntu 18.04.
Step 2 - Docker Install
So there are a ton of ways to install docker, when I was starting this project I was installing rancher so I used their install script which also installed functionality for Kubernetes, but there is no need for that in most instances especially for a homelab as is my situation. There script is right below*.
*This will technically increase your risk if you have a security mindset as you are leaving programs installed that will not be updated and therefore may be vulnerable. Also, you will need to run the command listed before about adding your user to the 'docker' group, but can skip docker compose.
However, like I said, that script is waaay more than what is needed for docker, but it does make life easy. To install docker, there are only a couple commands.
You may have to add your account to the 'docker' group after this and that can be done with:
Once this is complete, you can check docker is running (you may have to log off and back in):
You will also want in install docker-compose as it allows for greater functionality within docker and Portainer to spin up more software within a single container. To do this:
You can check that this is complete and running
Step 3 - Portainer Install
So Portainer is super easy to install thankfully. If you are on the Portainer site, you'll see 2 quick commands to install it. Side note, this will also be your first docker container if you have been following this guide so CONGRATS!.
docker run -d -p 8000:8000 -p 9000:9000 -p 9443:9443 \
--name=portainer --restart=always \
-v /var/run/docker.sock:/var/run/docker.sock \
-v portainer_data:/data \
portainer/portainer-ce:latest
Note: the -v /var/run/docker.sock:/var/run/docker.sock option can be used in Linux environments only.
That is it. Its done.
Step 4 - Portainer Access
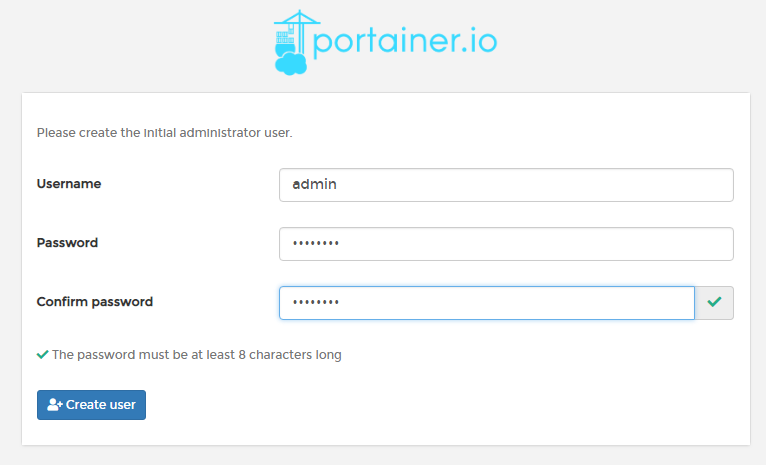
Logging into Portainer is simple. In your browser got to [IPofDockerHost]:9000. You will be faced with a login page, that has admin as the user and blank passwords for you to put in. If you want to change your user, do it here so you don't have to create a new one and delete the based admin account.
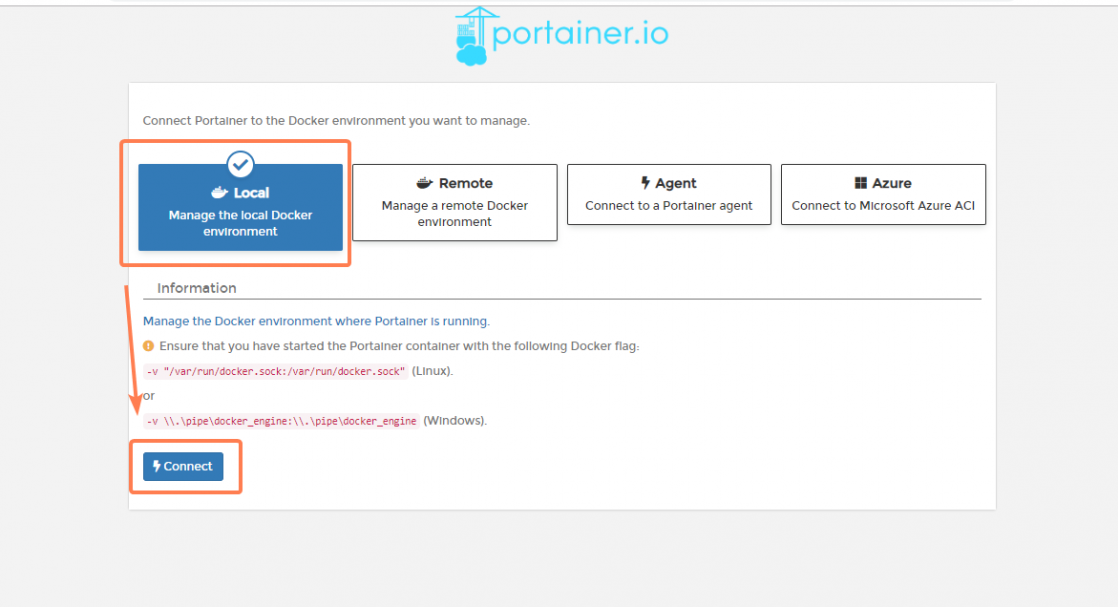
You will be given a quick dashboard that will ask you how you connect Portainer. The option we are choosing the local option which will require you hit the connect button below to access the docker.sock file that we use previously in the Portainer install.
Navigation and Operation
Navigation 1 - Portainer Dashboard
So Portainer on onset has a really nice dashboard that you can use to see what is running, after you select your Portainer instance. I guess I should mention that first.
The first screen that you see is the list of all your Portainer connections. What this means is that you can have multiple host that run dockers and connect all of them to a single Portainer instance so you can remotely manage them. I can see a use for this, but I don't think that I will use it in my case. So with that, you will want to select "Local."
Now we see quite a bit on this screen. First and foremost on the top left you will see Endpoint data from CPUs, Ram, and Storage space. Below that you have your main dashboard, hence why it is big and in your face, which is perfect because that is why we are here. The icons are as follows:
- Stacks - This is where/if you use a docker compose .yaml file to create a container, it will create all the required containers at the same time and link them together. Makes build outs of containers like Bookstack, which is what host the wiki, together.
- Images - These are the images that are associate to the containers that you have made. Think of them like the OS image that the software sit on. There is also an indicator of the amount of space they are taking up so be aware of that if you end up running out of space.
- Networks - This is the networks that are associated to your containers. By default you will have 2, the bridge and host, and if you are just building a container, then you will use your bridge, but if you build a stack, it will create a new network for those connections.
- Containers - Oh look your Docker containers.
- Volumes - These are the volumes that are associated to your containers. I can't think of any time I have ever had to adjust a container volume. I am sure there would be a reason for it, I am just not sure what it would be.
From here, you would select what you are needing to work on, typically that is going to be "Stack" or "Containers"

Navigation 2 - Stack Configurations
Stacks are those lovely docker compose files like those provided by the beautiful linuxserver folks.
Stacks is the idea that you can build multiple containers with one command. Like the code-block below.
You don't have to have a docker-compose file, you can always create your own. In the stacks menu, just click "Create Stack" and then paste your compose file, change the variables like password and timezone, and then click deploy. That easy.
Navigation 3 - Container Configurations
So containers are those software containers that we use, like this blog, making it self-contained. The container's menu is where you can build your containers, using dockerhub. However, the list allows for you to see what is running, logs of running containers, stats, and enter the console of the container. You create new containers with the "+Add container" and insert the variables that you need.
Navigation 3.5 - App Templates
So sometimes, you don't want to figure out the variables... I mean I am still learning docker, so I am like that as well. That is where "App Templates" are a life saver.
Most applications need databases, or maybe you want to build a website (like this one). There is probably an app template for that.
This would be similar to Unraid's community app, plus you can also create your own template.
Updating Portainer
So Portainer, like all applications, will have updates. Some you might want to ignore, other you might not want to. To
docker stop portainer
docker rm portainer
docker pull portainer/portainer:latest
docker run -d -p 8000:8000 -p 9000:9000 -p 9443:9443 \
--name=portainer --restart=always \
-v /var/run/docker.sock:/var/run/docker.sock \
-v portainer_data:/data \
portainer/portainer-ce:latest
Out Here
I hope that this helps you figure out how to install and use Portainer. I have the intention of putting a video for this up so you can follow along in the near future. You can check out the channel for an update if the video isn't posted on top. Any suggestions would also be appreciated.
Want to get a hold of me?
Email | [email protected]
Discord | Odin's Corner
Come to the discord server and ask for help, ask questions, play games. Currently, I am really the only person that is supporting so please be patient with me.